‘In short, intelligence, considered in what seems to be its original feature, is the faculty of manufacturing artificial objects, especially tools to make tools’
– Henri Bergson, Creative Evolution
Henri Bergson. He didn’t explicitly say that flintknappers are geniuses, but he probably meant that.

…and who doesn’t enjoy a bit of ego-stroking from influential French philosophers?
I was pondering where to start this series (beyond the obvious introduction post a couple of weeks ago) and decided to start more or less at the beginning with a look at the kind of tools I’ve been introduced to since apprenticing with Karl. As we’re not able to pillage flint veins like Grimes Graves for nice fresh tabular flint, we don’t need to worry about mining equipment, as the flint we buy is already in nodule form (usually as side products from quarrying for other things, like gravel or chalk). When we get our hands on the flint and we’re ready to knap, our first task is to get into the flint and produce some good sized flakes to work with. As you’d expect, the size of the flakes that come off the nodule depend on the size of the nodule, and where and how you strike it. Deciding where to start on a nodule is a bit of a ‘heart-in-mouth’ moment. Not only do you need to pick a good spot to hit, there’s the excitement of not knowing what’s going to be inside. Sure, the flint might have sounded awesome when we sourced it (and there’ll be a post somewhere in the series about the properties of flint and how to pick a good ‘un) but so many times there’ll be a flaw or problematic inclusion that only shows itself once you’ve opened it up. Nothing quite like being trolled by flint!
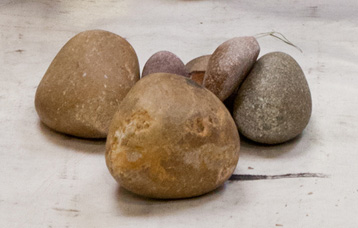
Best thing to hit a rock with? Other rocks.
As always with flintknapping, it’s all about the angles; you don’t want to start with a rounded surface because all you’ll do is crush rock and jar your wrist. You need a decent platform for that first blow, and a suitable hammerstone – the first tool in the bag of tricks. Ideally you should have a selection of differently sized hammerstones for different sized nodules. Attacking a knee height monster of a flint with a pebble would be highly amusing for onlookers but is unlikely to knock off a good flake. Above you can see a few of the hammerstones Karl carts around in his toolbag; most are just the type of rounded quartzite cobbles that you can find at the beach or very occasionally for sale in garden centres as rockery adornments. DO NOT use a flint hammerstone if you value the use of your hand; while quartzite and similar materials will tend to crumble and won’t produce sharp edges if they break, using a flint hammerstone is asking to end up with a fistful of exceptionally sharp shards if it gives up on striking. Your hammerstones should be personal to you – there’s no point having a massive tool if you’re not comfortable or competent in how you handle it (quiet in the cheap seats). My hammerstones are smaller than Karl’s purely because I have teeny tiny child hands. Make sure you pick one you can get a firm grip on, that sits well in the hand, as the last thing you want to do is fumble when you’re trying to open a nodule up. Bear in mind that you’re often just using the weight of the hammerstone in a ‘guided fall’ – there’s no need to put a mighty swing into every blow. Let gravity and the weight of the stone do some of the work for you.
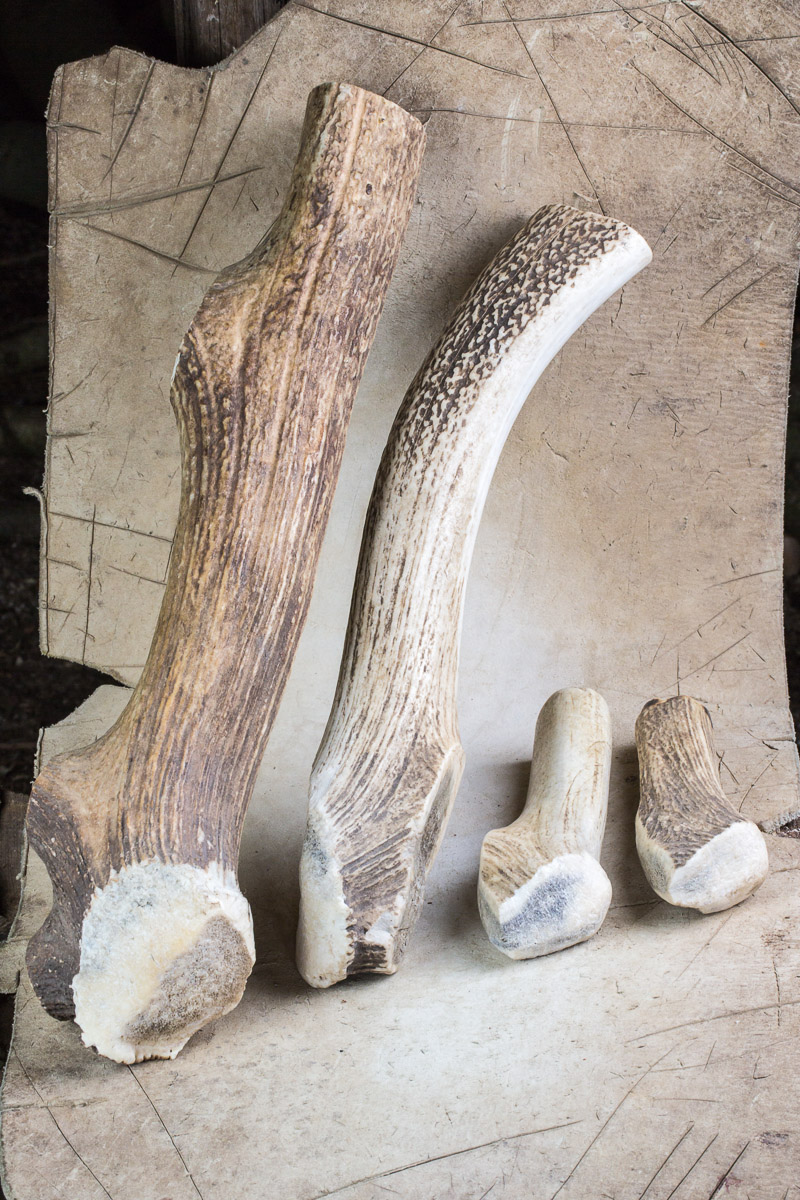
For best results, wait for the deer to shed the antlers before using them for knapping.
Next out of the bag are the ‘soft’ hammers. Using the hammerstones will produce big chunky flakes with large bulbs of percussion (the semi-cone shape where the flint was struck); this is fine for knocking off flakes to work but for anything more refined than roughing out, you’ll want to switch to something like these antler hammers (see right). There are a few different materials you can use for soft hammer percussion; bone works alright although it’s not as durable as antler, apparently Lignum Vitae works although I’ve never used it outside of the forge, and if you want to cheat use more modern materials, some types of metal hammer will work. The soft hammers that Karl uses are all red deer antlers and like the stone, they vary in size – the one on the left in the picture I have dubbed ‘The Beast’; there’s no scale in the picture but it’s about a cubit long (I’m not an obsolete measurement afficionado, I just don’t have a ruler to hand). Sourcing antler can be both expensive and a chore – I advise you to make friends with a gamekeeper or park warden, and scoop them up when the deer shed. Otherwise you’re pretty much at the mercy of Fleabay, with all that entails. The reason antler and bone work is that they are softer relative to the flint, which allows them to ‘bite’ onto the edge of the flint and detach a thinner flake with a much smaller bulb of percussion. Antler will last quite some time, bone less so – as soon as you’ve worn through to the spongiform inside, it’s time to get a new hammer. Be careful handling the hammer end as well, as tiny little chips of flint may be embedded on the striking surface.
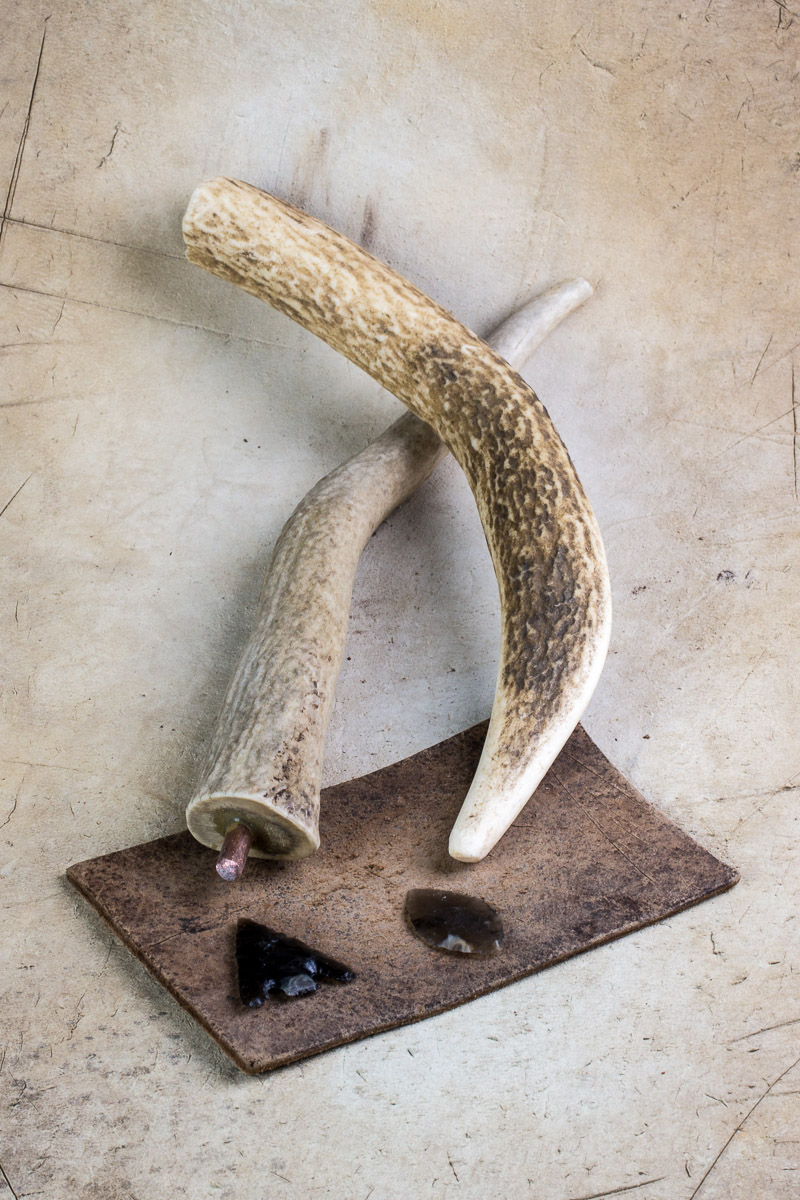
A pair of pris-tine pressure flakers.
…I’ll get my coat.
The last tool we’ll look at here are pressure flakers (see left). These are from the same antlers that provided the soft hammers above; no need to chuck the tines away when you’ve removed them, they will be essential to making arrowheads and other tools where delicacy and precision are required. Using a pressure flaker is the same principle as wearing stiletto shoes – it’s a method of putting a lot of force through a very small area. Instead of striking the flint, you position the end of the pressure flaker where you want the flake to detach, and then rock forward and use your body weight to ‘push’ the flakes off. This sounds easier than it actually is, and you’ll end up with a fetching blister on your index finger (#fwp) but it lets you direct the flaking with the efficiency vital to making arrowheads. There are two types of pressure flaker in the photo, and which one you use depends on what you are making. For example, if you’re making Bronze Age barbed and tanged arrowheads, you can use the tool on the left, with has a copper rod glued into the base of the tine. For anything predating the use of metals, you should either use another tine that is just antler, or swap ends. Using a pressure flaker can be dangerous, even with the two pieces of leather padding that you use to protect your palm. Ask Karl about the ‘shotgun cartridge’ incident!
In the next post I’ll be looking at one of the simplest and most common tools in the prehistoric toolkit, and one that’s ideal for beginners to start with – the humble hide scraper. Check back in a few weeks and if you have any comments or questions, feel free to post below!
Excellent idea to keep a blog, Heather. I look forward to following your adventures and learning whilst you are. Keep it up!